-
Giving Insomnia a try for testing a REST API. Took a while to find the downloadable artefact, but first impressions are pretty good. Have yet to explore the more advanced features like chaining requests, but good to see that this is supported.
-
Found this DynamoDB item calculator which would estimate the size of DynamoDB records. Useful for those times when you’re wondering if you can get away with using BatchGetItem without worrying about unprocessed keys and the 16 MB limit.
-
Need to find an alternative to Postman for API testing. It’s quite capable, but something just repels me from using it. Might be its insistence that I should make an account, or maybe because the UI feels inefficient and clunky to use. I’d like to like it, but it’s just not doing it for me.
-
Random fact I found on Wikipedia today: apparently marsupials are less likely to contract rabies because they have a slightly lower body temperature than placental mammals (35°C vs. 37°C or so).
Only reason why I searched for this is that we’ve got a possum trap setup at work and someone asked if one could get rabies from a possum bite. I’m pretty sure rabies is not really a major problem here in Australia, but it’s interesting to know that marsupials are naturally more resistant to it for this reason (not that I’d be interested in testing this out myself).
-
If I were ever to make an RSS service like Feedbin, I’d probably add a feature which would delay some items until a specific day of the week. Some posts I get feel more suitable for weekend reading.
-
📺 Nintendo’s Luckiest Accident
So apparently the “watch” in Game & Watch actually references the time piece. Until I watched this video, I actually thought it meant watching the demo that played while in Time mode.
-
Just discovered that Stripe has a changelog, which is great. But they don’t offer it as an RSS feed, which is crazy. Seems like this would naturally translate into an RSS feed. They have one for their engineering blog so it’s not like they unfamiliar with the concept.
-
Getting a little tired of listening to podcasters talk about the Apple Vision Pro (I guess you have to be there). I’m more excited to hear about Manton talk about Micro.blog’s new notes feature on Core Intuition.
-
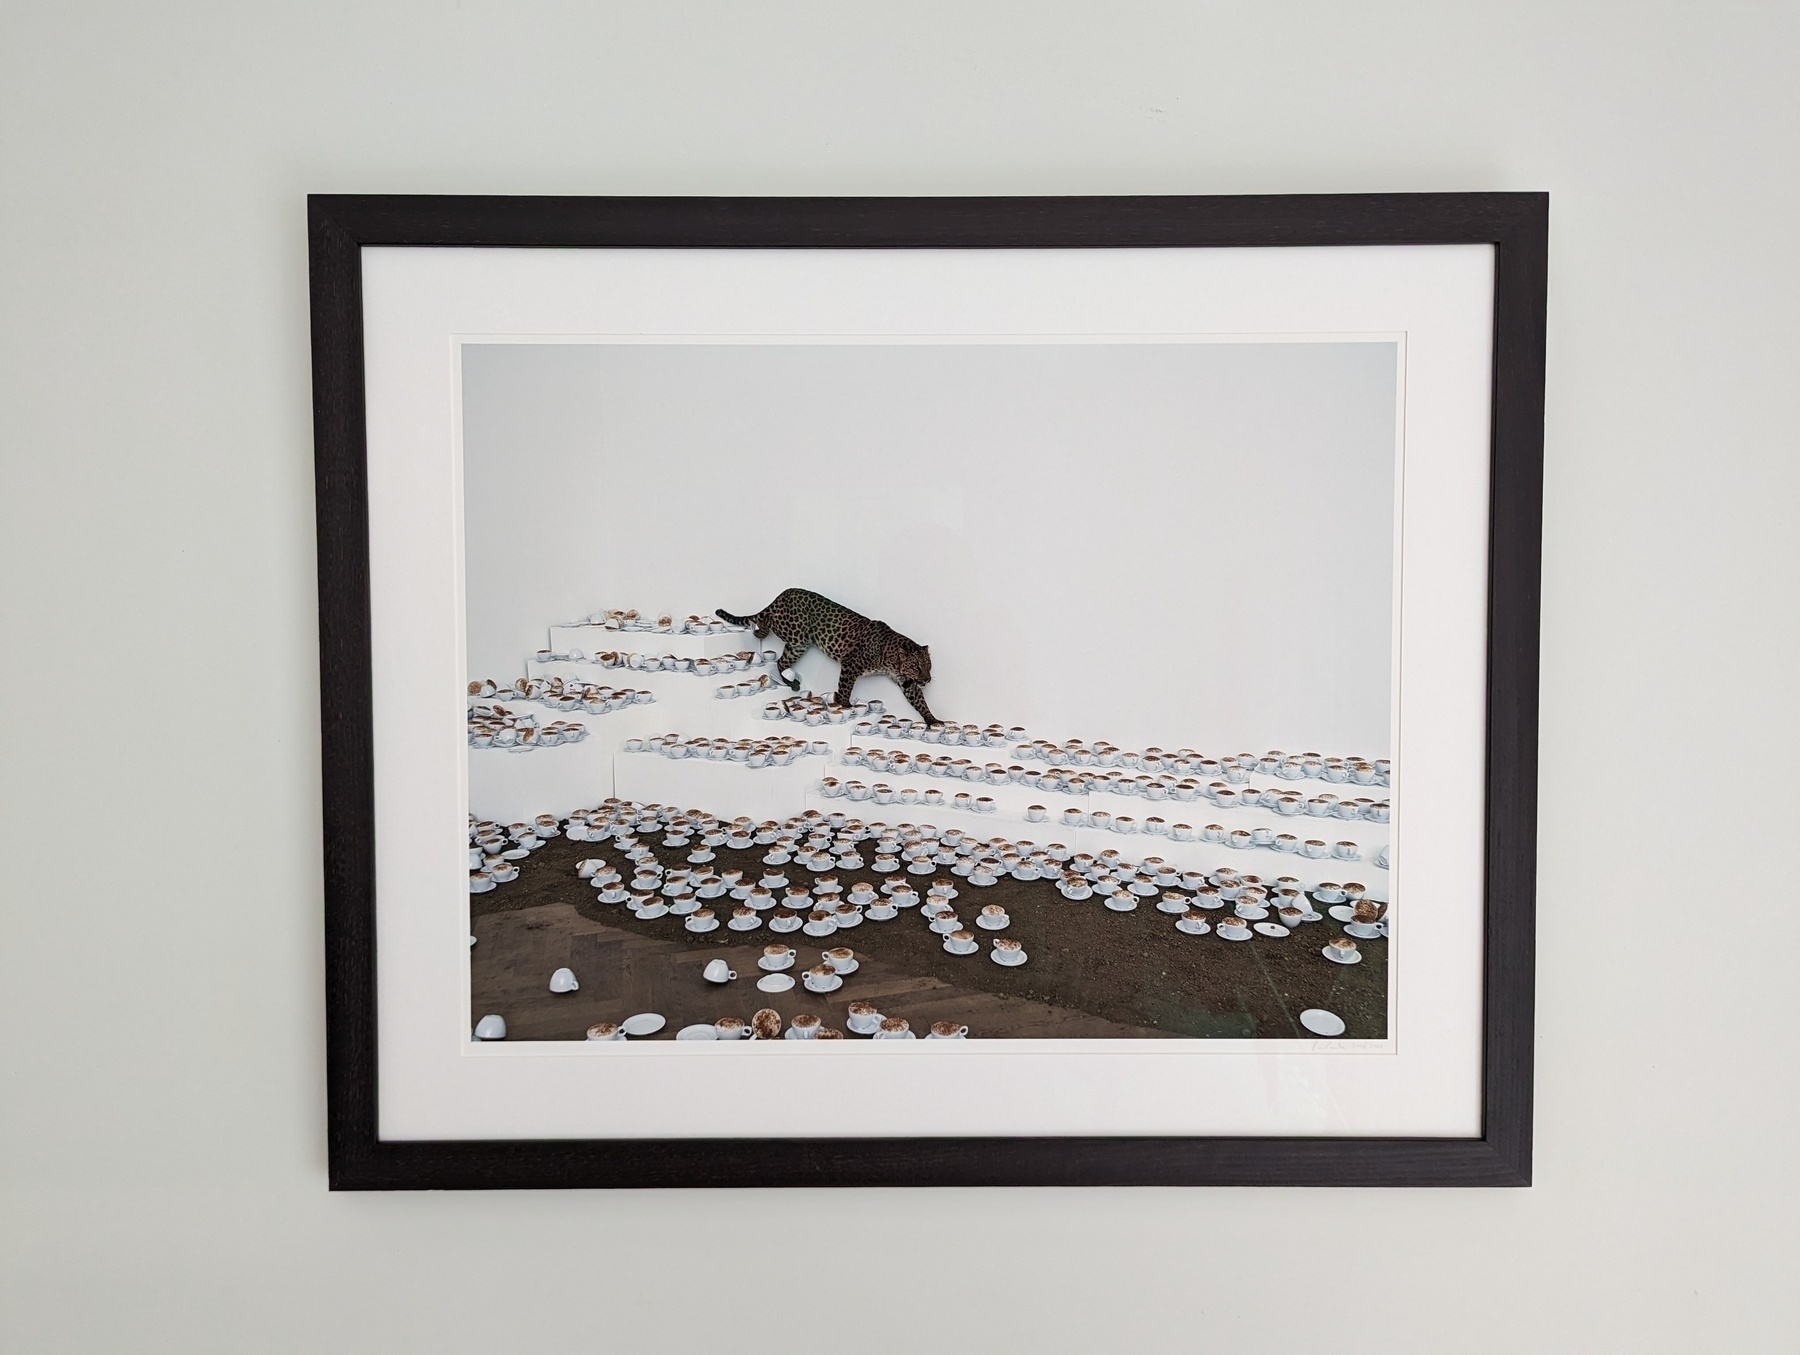
One Cup of Cappuccino Then I Go, by Paola Pivi
Saw this print while I was in Europe and liked it enough to buy a copy. Finally got it framed after several months, and now it’s on my wall. Turned out great.
-
🔗 The internet used to be ✨fun✨
Lot of interesting posts here about the personal web, both current and old school. I’ve been ducking in and out of this for a week now. Via the HV Discord.
-
Users of Go: don’t fear the zero value. Resist the urge to use string pointers for things that can be left unset. We need not live like Java developers (let’s not even mention
nullandundefinedthat our poor JavaScript brethren have to deal with). Learn to embrace the one nothing we have. -
Complexity Stays At the Office
It’s interesting to hear what others like to look at during their spare time, like setting up Temporal clusters or looking at frontend frameworks built atop five other frameworks built on React. I guess the thinking is that since we use it for our jobs, it’s helpful to keep abreast of these technologies. Not me. Not any more. Back in the day I may have though similar. I may even have had a passing fancy at stuff like this, revelling in its complexity with the misguided assumption that it’ll equal power (well, to be fair, it would equal leverage). Continue reading →
-
Bought some “genuine” EarPods as emergency headphones I can keep in my bag. Wired earbuds are not my preferred listening device. Well, at least they’ll act as a deterrent from forgetting my headphones again.

-
Well, it’s finally happened. I’ve left for work without my headphones. 🙁
-
Worse Is Better
Gabz latest post about ChatGPT’s ability to write “good” reviews gave me pause: Here is the thing, every now and then I write about things that I like, among them, video games. I am also aware that although I am not a professional reviewer, I’d like my posts to come across with a certain level of, I don’t know, some quality/standards/mission/quest. […] Whenever I write a post about something I liked it is in a very unprofessional manner, or informal manner, rather, as if I was just talking to you. Continue reading →
-
Photo Bucket Galleries and Using the HTML Popover API
Spent a bit more on Photo Bucket this evening. Tonight I started working on galleries, which’ll work more or less like albums. At the moment you can create a gallery and add a photo to it. Most of the work so far has been backend so the UI is pretty rough. Eventually you’ll be able to do things like rearrange photos within galleries, but for the moment they’ll just be added to the end. Continue reading →
-
Yep, I think 22 minutes at 150°C works for toasting frozen hot cross buns in a cold oven. Toasty and warm without being burnt or too hot to eat. Might even be able to push it to 23 minutes but I probably wouldn’t go higher than 25.
-
I kinda wish there was a fan edit of Mad Men that condensed all 7 seasons into one that contain only the avertising aspets of the show. All the domestic, love interest, personal flashbacks, etc. aspects — unless they relate directly to the advertisement plot lines — I can probably live without.
-
Message Simulator Client
Years: 2017 — 2020 Status: Gone I once worked at a company that was responsible for sending SMS messages via an API. Think one time passwords when you log into websites, before time-based OTP apps were a thing. And yeah, this did involve some “marketing” messages, although we were pretty strict about outright spam or phishing messages. Anyway, since sending messages costed us money, we had a simulator setup in our non-prod environments which we used for testing. Continue reading →
-
Photo Bucket lives, at least in an alpha state. It’s being used for the Folio Red Gallery, which would eventually consist of project screenshots that didn’t make it into the posts themselves. It looks ugly, and there are pretty large feature gaps, but it’s finally serving images.
-
Lost Album, Found
For the past 3.5 years, I’ve been searching on and off for a particular album: the original soundtrack to the David Attenborough series The Private Life of Plants. This lost album was quite elusive. It wasn’t on any of streaming services, and I couldn’t find a digital copy to buy. The only place I found that had anything was some defunct online music store, archived by the Wayback Machine, that offered a handful of tracks to download. Continue reading →
-
Another attempt at working out how best to heat up hot cross buns from the freezer in a cold oven. Tried 150°C for 20 minutes. It’s better. I think it’s pretty close. But still not warm enough. Maybe 22 minutes next time.