
Building F5 To Run
At the risk of talking about something that I’ve only just started, I’d thought today I write about what I’m working on right now.
I’ve been going through my digital archives this weekend, trying to get it into something more permenant than the portable USB drives it’s currently stored on. Amongst all that stuff is a bunch of QBasic apps and games I wrote way back when I was a kid. Over the years it’s laid dormant but I do like revising them from time to time.
Is it a form of nostalgia? An attempts to live past glories? Maybe? I was pretty proud of them at the time, much like anyone else that’s proud of their early stuff while they’re leaning to code. And I know about the risk of living in the past at the expense of the present. But I also know that if I get rid of them, I’d regret it. I already regret loosing the things from the archive so far, due to bad disks or just missing things while copying them from portable hard-drive to portable hard-drive. I don’t want to loose any more.
So in an act of posterity, I’d figured it’s time to coat them in amber and put them online. So that’s what I’m doing now.
These apps run without issue in DosBox, and hearing about how the Wayback Machine has managed to make a bunch of DOS games playable within the browser, I wondered if I could do something similar. Anything that deals with virtualisation is always going to be a little bit involved. I guess one thing going for these is that they were written for a pretty slow machine and a pretty thin OS that would be trivial for modern hardware to emulate. The apps themselves, even compiled to an EXE file, are not very taxing on the hardware back then either. But I still expected to do a bit of heavy lifting myself.
How wrong I was! After a tiny bit of research — and by tiny I mean one Ecosia search — I managed to find a JavaScript library called JS-Dos which provides a DosBox emulator that’s runnable from a browser. All I need to do is prepare a bundle on what I want to run (more on that below) and with a bit of JavaScript, I can start a DosBox machine in the browser and mount it to a HTML element. The library does all the work.
How To Use JS-Dos
It’s still early days, but here’s what I learnt about using the library so far.
First, the library comes as a NPM package, or can be loaded from their CDN in the form of a <script> import.
I first tried using the NPM package, but I didn’t know the appropriate import statement to use, and the documentation was not forthcoming on this front.
So I went with the CDN approach. I’m using Hugo Pipes to fetch the remote JavaScript file and make a local bundle so I can host it from the site itself. It comes with some CSS which I also need to get (note, I’m using parenthesis instead of curly braces here as I’m not sure how to include two curly braces in a code-block).
(( $jsDosCSS := resources.GetRemote "https://js-dos.com/v7/build/releases/latest/js-dos/js-dos.css" ))
<link rel="stylesheet" href="(( $jsDosCSS.RelPermalink ))">

(( $jsDosJS := resources.GetRemote "https://js-dos.com/v7/build/releases/latest/js-dos/js-dos.js" ))
<script src="(( $jsDosJS.RelPermalink ))" defer></script>
I also needed to get an appropriate wdosbox emulator. This comes in the form of a WASM file, plus a small JavaScript file which
I assume is some simple bootstrapper. I’ve downloaded these and stored them in the static/emulators directory of my Hugo project.
The JSDos library loads them on demand and I needed to set the URL path prefix for these two files so that JSDos knows where to get them:
emulators.pathPrefix = '/emulators/';
Next, I needed to build a bundle. These are the DOS programs that are launched with DosBox. They’re effectively just Zip files holding some metadata, the DOS executable, and any files needed for the program to run. There’s some basic information about how to make them, and there’s even an online tool which will take on a lot of the tedious work. I’ve used it to make a couple of test bundles and it works quite well. I’d like to eventually make my bundles myself but I’ll stick with the tool for the time being, at least until I’ve got a DosBox configuration that I’m happy with. One thing the tool does is give you the ability to define an overlay so that these DOS apps are usable from within a mobile browsers. I’ll see if I can get away from needing these overlays at this stage. I’m not expecting anyone with a mobile app to try these out.
The contents of .jsdos/dosbox.conf for the test bundle `logo-2.jsdos`
[sdl]
autolock=false

fullscreen=false
fulldouble=false
fullresolution=original
windowresolution=original
output=surface
sensitivity=100
waitonerror=true
priority=higher,normal
mapperfile=mapper-jsdos.map
usescancodes=true
vsync=false
[dosbox]
machine=svga_s3

language=
captures=capture
memsize=16
[cpu]
core=auto
cputype=auto
cycles=max

cycleup=10
cycledown=20
[mixer]
nosound=false
rate=44100

blocksize=1024
prebuffer=20

[render]
# frameskip: How many frames DOSBox skips before drawing one.
#    aspect: Do aspect correction, if your output method doesn't support scaling this can slow things down!.
#    scaler: Scaler used to enlarge/enhance low resolution modes.
#              If 'forced' is appended, then the scaler will be used even if the result might not be desired.
#            Possible values: none, normal2x, normal3x, advmame2x, advmame3x, advinterp2x, advinterp3x, hq2x, hq3x, 2xsai, super2xsai, supereagle, tv2x, tv3x, rgb2x, rgb3x, scan2x, scan3x.

frameskip=0
aspect=false
scaler=none

[midi]
#     mpu401: Type of MPU-401 to emulate.
#             Possible values: intelligent, uart, none.
# mididevice: Device that will receive the MIDI data from MPU-401.
#             Possible values: default, win32, alsa, oss, coreaudio, coremidi, none.
# midiconfig: Special configuration options for the device driver. This is usually the id of the device you want to use.
#               See the README/Manual for more details.

mpu401=intelligent
mididevice=default
midiconfig=

[sblaster]
#  sbtype: Type of Soundblaster to emulate. gb is Gameblaster.
#          Possible values: sb1, sb2, sbpro1, sbpro2, sb16, gb, none.
#  sbbase: The IO address of the soundblaster.
#          Possible values: 220, 240, 260, 280, 2a0, 2c0, 2e0, 300.
#     irq: The IRQ number of the soundblaster.
#          Possible values: 7, 5, 3, 9, 10, 11, 12.
#     dma: The DMA number of the soundblaster.
#          Possible values: 1, 5, 0, 3, 6, 7.
#    hdma: The High DMA number of the soundblaster.
#          Possible values: 1, 5, 0, 3, 6, 7.
# sbmixer: Allow the soundblaster mixer to modify the DOSBox mixer.
# oplmode: Type of OPL emulation. On 'auto' the mode is determined by sblaster type. All OPL modes are Adlib-compatible, except for 'cms'.
#          Possible values: auto, cms, opl2, dualopl2, opl3, none.
#  oplemu: Provider for the OPL emulation. compat might provide better quality (see oplrate as well).
#          Possible values: default, compat, fast.
# oplrate: Sample rate of OPL music emulation. Use 49716 for highest quality (set the mixer rate accordingly).
#          Possible values: 44100, 49716, 48000, 32000, 22050, 16000, 11025, 8000.

sbtype=sb16
sbbase=220
irq=7
dma=1
hdma=5
sbmixer=true
oplmode=auto
oplemu=default
oplrate=44100

[gus]
#      gus: Enable the Gravis Ultrasound emulation.
#  gusrate: Sample rate of Ultrasound emulation.
#           Possible values: 44100, 48000, 32000, 22050, 16000, 11025, 8000, 49716.
#  gusbase: The IO base address of the Gravis Ultrasound.
#           Possible values: 240, 220, 260, 280, 2a0, 2c0, 2e0, 300.
#   gusirq: The IRQ number of the Gravis Ultrasound.
#           Possible values: 5, 3, 7, 9, 10, 11, 12.
#   gusdma: The DMA channel of the Gravis Ultrasound.
#           Possible values: 3, 0, 1, 5, 6, 7.
# ultradir: Path to Ultrasound directory. In this directory
#           there should be a MIDI directory that contains
#           the patch files for GUS playback. Patch sets used
#           with Timidity should work fine.

gus=false
gusrate=44100
gusbase=240
gusirq=5
gusdma=3
ultradir=C:\ULTRASND

[speaker]
# pcspeaker: Enable PC-Speaker emulation.
#    pcrate: Sample rate of the PC-Speaker sound generation.
#            Possible values: 44100, 48000, 32000, 22050, 16000, 11025, 8000, 49716.
#     tandy: Enable Tandy Sound System emulation. For 'auto', emulation is present only if machine is set to 'tandy'.
#            Possible values: auto, on, off.
# tandyrate: Sample rate of the Tandy 3-Voice generation.
#            Possible values: 44100, 48000, 32000, 22050, 16000, 11025, 8000, 49716.
#    disney: Enable Disney Sound Source emulation. (Covox Voice Master and Speech Thing compatible).

pcspeaker=true
pcrate=44100
tandy=auto
tandyrate=44100
disney=true

[joystick]
# joysticktype: Type of joystick to emulate: auto (default), none,
#               2axis (supports two joysticks),
#               4axis (supports one joystick, first joystick used),
#               4axis_2 (supports one joystick, second joystick used),
#               fcs (Thrustmaster), ch (CH Flightstick).
#               none disables joystick emulation.
#               auto chooses emulation depending on real joystick(s).
#               (Remember to reset dosbox's mapperfile if you saved it earlier)
#               Possible values: auto, 2axis, 4axis, 4axis_2, fcs, ch, none.
#        timed: enable timed intervals for axis. Experiment with this option, if your joystick drifts (away).
#     autofire: continuously fires as long as you keep the button pressed.
#       swap34: swap the 3rd and the 4th axis. can be useful for certain joysticks.
#   buttonwrap: enable button wrapping at the number of emulated buttons.

joysticktype=auto
timed=true
autofire=false
swap34=false
buttonwrap=false

[serial]
# serial1: set type of device connected to com port.
#          Can be disabled, dummy, modem, nullmodem, directserial.
#          Additional parameters must be in the same line in the form of
#          parameter:value. Parameter for all types is irq (optional).
#          for directserial: realport (required), rxdelay (optional).
#                           (realport:COM1 realport:ttyS0).
#          for modem: listenport (optional).
#          for nullmodem: server, rxdelay, txdelay, telnet, usedtr,
#                         transparent, port, inhsocket (all optional).
#          Example: serial1=modem listenport:5000
#          Possible values: dummy, disabled, modem, nullmodem, directserial.
# serial2: see serial1
#          Possible values: dummy, disabled, modem, nullmodem, directserial.
# serial3: see serial1
#          Possible values: dummy, disabled, modem, nullmodem, directserial.
# serial4: see serial1
#          Possible values: dummy, disabled, modem, nullmodem, directserial.

serial1=dummy
serial2=dummy
serial3=disabled
serial4=disabled

[dos]
#            xms: Enable XMS support.
#            ems: Enable EMS support.
#            umb: Enable UMB support.
# keyboardlayout: Language code of the keyboard layout (or none).

xms=true
ems=true
umb=true
keyboardlayout=auto

[ipx]
# ipx: Enable ipx over UDP/IP emulation.

ipx=true
[autoexec]
echo off
mount c .
c:

type jsdos~1/readme.txt
echo on

LOGO.EXE
I’m keeping the bundles in the static/bundles directory, which sits alongside the emulator WASM file. They’re not huge binaries but I’m still using git lfs to manage them. Best to keep the the Git repository relatively sane.
Finally, it’s just a matter of adding some JavaScript to start DosBox, load the bundle, and mount it onto a HTML element:
Dos(document.querySelector("#element-to-mount")).run("/bundles/bundle-to-load.jsdos");
And that’s pretty much it.
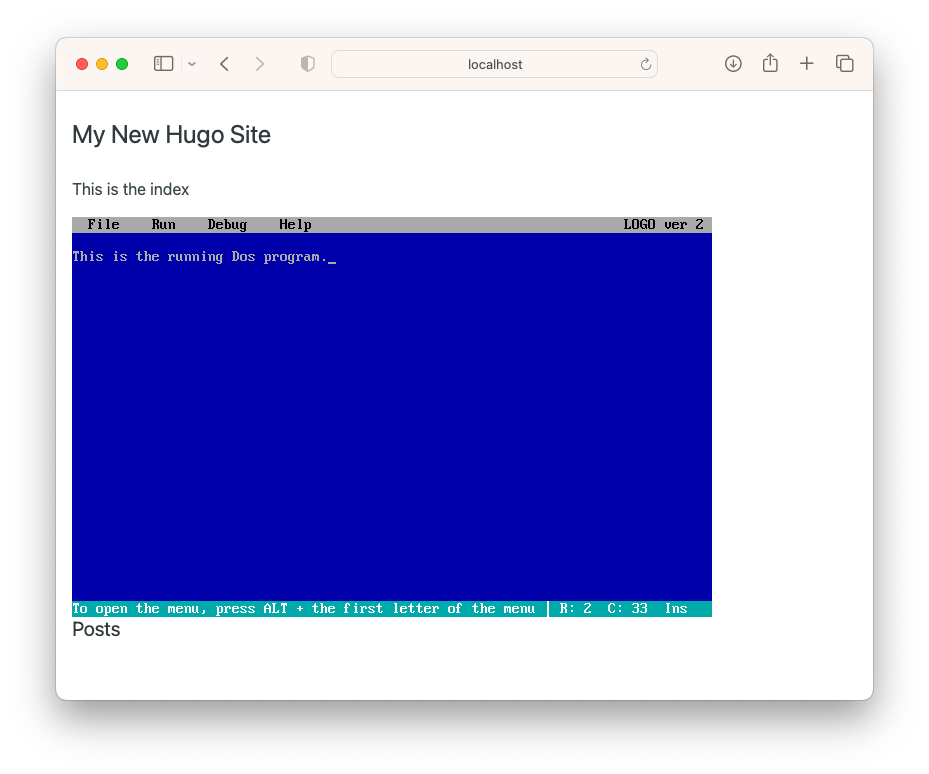
After a few hours, I’ve managed to get a test version of this working. There are a few things that need working on: the app I’m trying require the Alt key, which is not readily available of Apple keyboards, so I may need to do something about that (JSDos comes with a virtual keyboard with Ctrl and Alt so it’s not a complete show-stopper)1. And I’ll need to get styling and more maintainable JavaScript written for this (I’m using StimulusJS for the JavaScript2). But I’m impressed by how well this works, given the minimal amount of effort from my part. Shoulders of giants and all that.