
-
First Impressions of the Cursor Editor
Trying out the Cursor editor to build a tool to move Micro.blog posts. Continue reading →
-
Playing Around With MacOS Image Playground
-
UCL: Some Updates
Made a few minor changes to UCL. Well, actually, I made one large change. I’ve renamed the
foreachbuiltin tofor.I was originally planning to have a
Continue reading →forloop that worked much like other languages: you have a variable, a start value, and an end value, and you’d just iterate over the loop until you reach the end. I don’t know how this would’ve looked, but I imagined something like this: -
About My New Cooler's Programming Feature
There’s lots to like about my new cooler, but the programming feature is not one of them. My old unit had a very simple timer with two modes: turn cooler on after N hours, or turn cooler off after N hours. Anything else requires manual intervention.
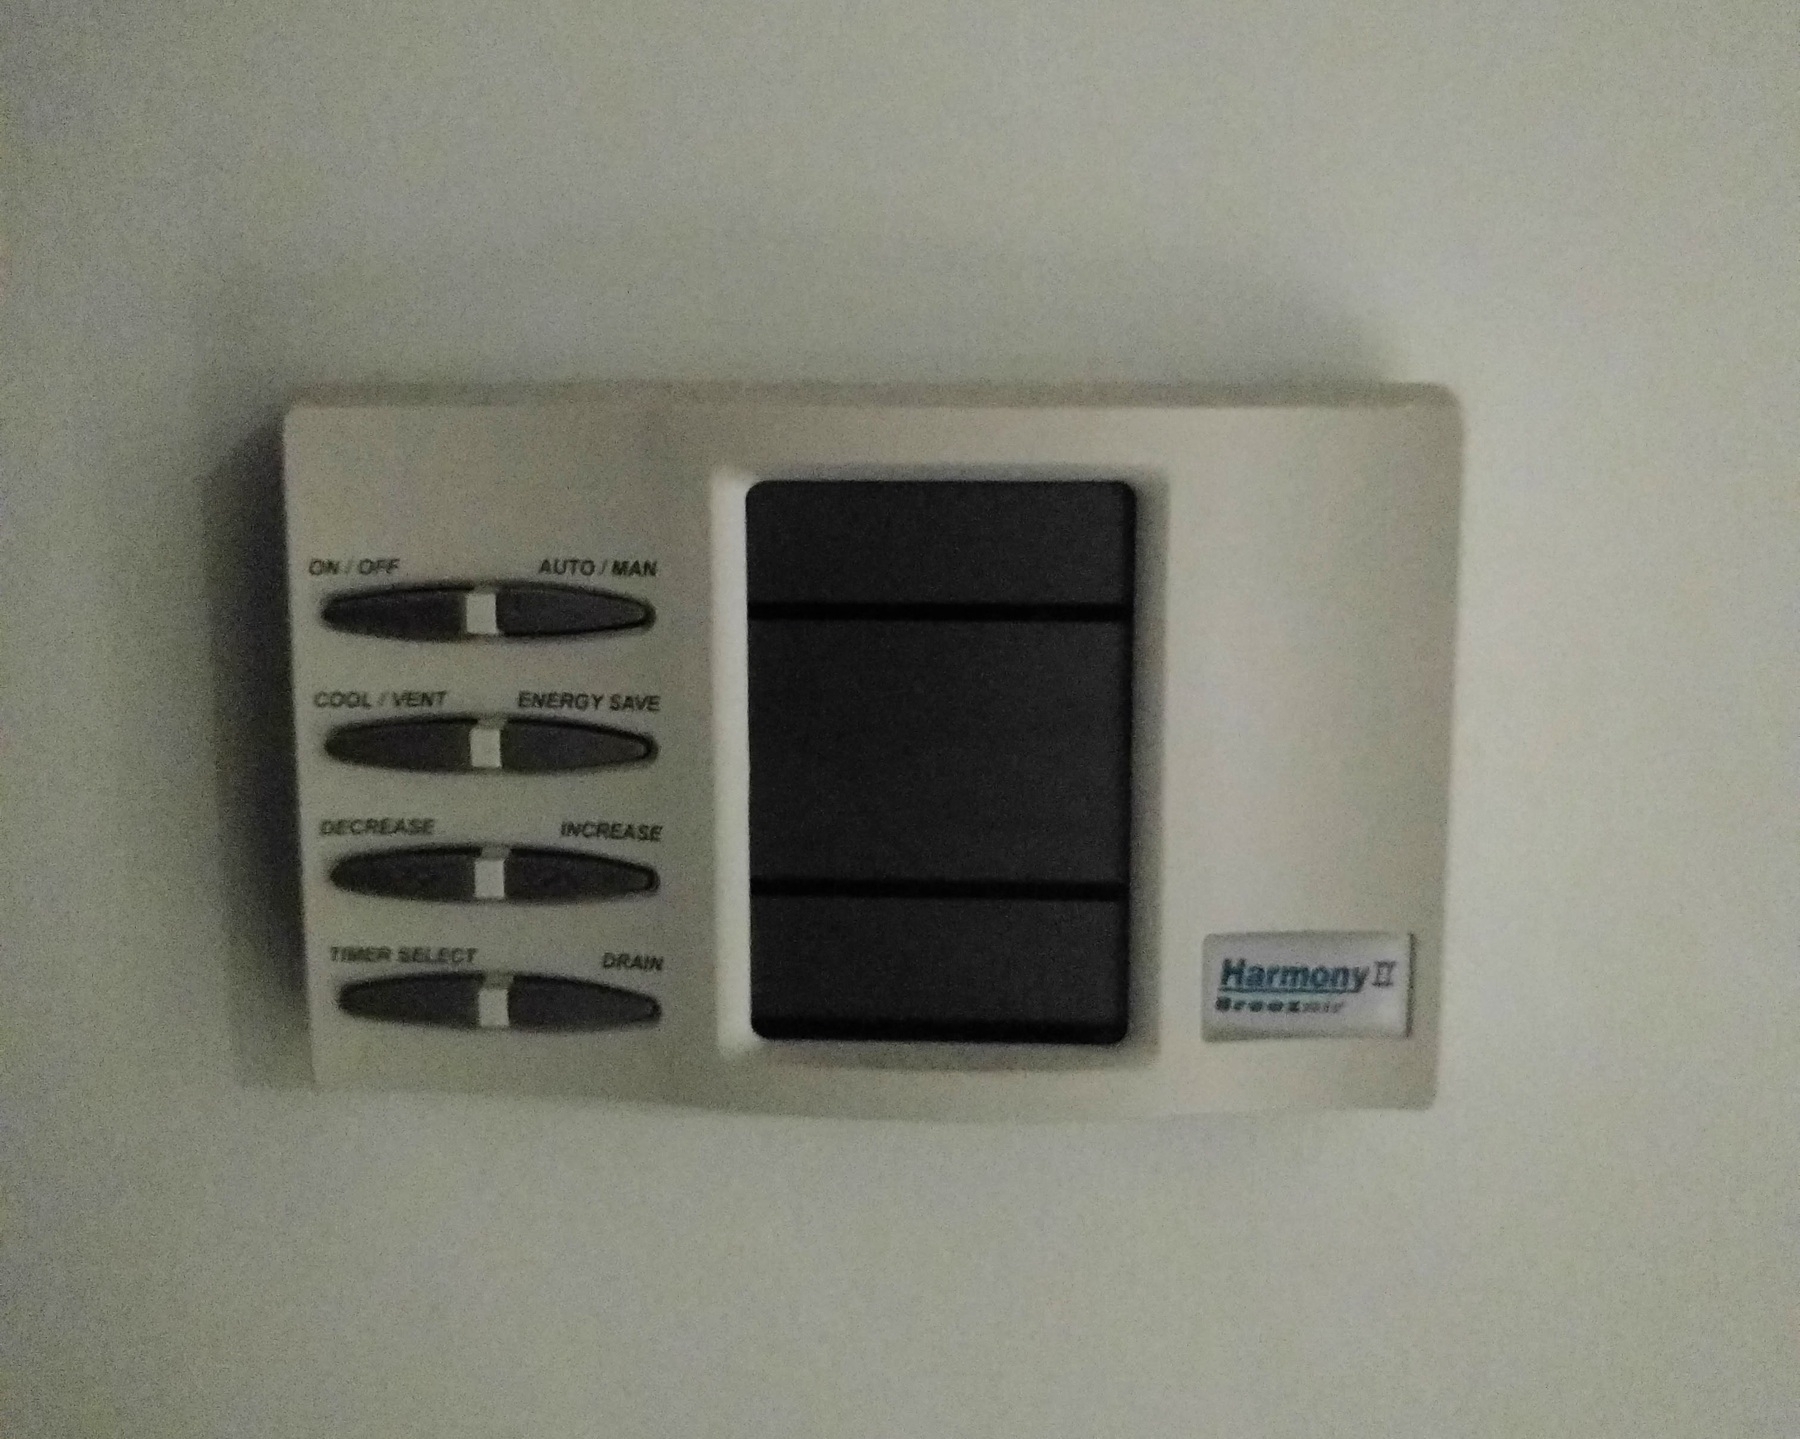
The old control panel (turns out I did have a photo, albeit an old one). Set the mode: cool/vent (fan), the power setting, then tap Timer Select to choose between turn on or off after N hours. I really liked this simple setup. Many times in summer, when the days are warm but not hot, and the nights are cool, it was nice to turn the cooler’s fan on and set the timer to turn it off after 2 to 3 hours, maybe longer if the days were a bit warmer1. The cooler will simply pull cool air from outside and circulate it around the room. This was enough for me to get to sleep, at which point the cooler would shut itself off in the middle of the night.
Continue reading → -
Idea for UCL: Methods
I’m toying with the idea of adding methods to UCL. This will be similar to the methods that exist in Lua, in that they’re essentially functions that pass in the receiver as the first argument, although methods would only be definable by the native layer for the first version.
Much like Lua though, methods would be invokable using the
:“pair” operator.strs:to-upper "Hello" --> HELLOThe idea is to make some of these methods on the types themselves, allowing their use on literals and the result of pipelines, as well as variables:
Continue reading → -
On Slash Pages Verses Blog Posts
Interesting discussion on ShopTalk about slash pages and whether blog posts may make more sense for some of them. Chris and Dave makes the point that blog posts have the advantage of syndicating updates, something that static pages lack on most CMSs. It’s a good point, and a tension I feel occasionally. Not so much on this site, but there’ve been several attempts where I tried to make a site for technical knowledge, only to wonder whether a blog or a wiki makes more sense. I’d like the pages to be evergreen yet I also like to syndicate updates when I learn new stuff.
Continue reading → -
Project Update: DSL Formats For Interactive Fiction
Still bouncing around things to work on at the moment. Most of the little features have been addressed, and I have little need to add anything pressing for the things I’ve been working on recently. As for the large features, well apathy’s taking care of those. But there is one project that is tugging at my attention. And it’s a bit of a strange one, as part of me just wants to kill it. Yet it seems to be resisting.
Continue reading → -
Gallery of Fake Logo For Test Organisations
A collection of humorous fake logos for test organizations is created for work-related purposes, primarily showcasing film and media production studios. Continue reading →
-
2024 Year In Review
It’s a few minutes to 12:00 PM on the 1st January 2025 when I published this. Thanks to time-zones, that means it’s just about to turn 12:00 AM one hour to the west of Greenwich, meaning that it’s still 2024 in much to the west of the prime meridian. So I’m technically still within the window of time where I could say I got a year in review post out for 2024.
Continue reading → -
Home Screen Of 2024
It’s just turned 3:00 in the afternoon, and I was alternating between the couch and the computer desk, racking my brain on what to do. With no ongoing projects — a few ideas have been bouncing around, yet none has grabbed me so far, and I had nothing else in a state where I could just slip on some music or a podcast and work on — and seeing a few others make similar posts on their blogs, I’d figured I talk about my home screens.
Continue reading → -
2024 Song of The Year
It’s Christmas Eve once again, which means it’s time for the Song of The Year for 2024. Looking at the new and rediscovered albums for the year, there are quite a few to choose from.
The runners up are pretty much all from Lee Resevere, a new artist I’ve started listening to, and includes:
- Should I Run, by Kristen Martell, arranged by Lee Rosevere
- Miles Wide, from Synths Working Overtime, by Lee Rosevere
- We’ve Been Here Before and Hide Your Heart, from Stationary Loops, by Lee Rosevere
But there can only be one winner, and this year it’s Oxygene, Pt. 20 by Jean-Michel Jarre. 👏
Continue reading → -
That Which Didn't Make The Cut
I did a bit of a clean-up of my projects folder yesterday, clearing out all the ideas that never made it off the ground. I’d figured it’d be good to write a few words about each one before erasing them from my hard drive for good.
I suppose the healthiest thing to do would be to just let them go. But what can I say? Should a time come in the future where I wish to revisit them, it’d be better to have something written down than not. It wouldn’t be the first time I wished this was so.
Continue reading → -
A Summer Theme
Made a slight tweak to my blog’s theme today, to “celebrate” the start of summer.
I wanted a colour scheme that felt suitable for the season, which usually means hot, dry conditions. I went with one that uses yellow and brown as the primary colours. I suppose red would’ve been a more traditional representation of “hot”, but yellow felt like a better choice to invoke the sensation of dry vegetation. I did want to make it subtle though: it’s easy for a really saturated yellow to be quite garish, especially when used as a background.
Continue reading → -
Delta of the Defaults 2024
It’s a little over a year since Dual of the Defaults, and I see that Robb and Maique are posting their updates for 2024, so I’d thought I do the same. There’ve only been a few changes since last year, so much like Robb, I’m only posting the delta:
- Notes: Obsidian for work. Notion for personal use if the note is long-lived. But I’ve started using Micro.blog notes and Strata for the more short-term notes I make from day to day.
- To-do: To-do’s are still going to where my notes go, which is now Strata. Although I’m still using Google Keep for shopping lists.
- Browser: Safari’s out from all machines. It’s Vivaldi everywhere now. Except iPad, where I don’t have a choice.
- Presentations: Believe it or not, I haven’t had to make a presentation since last year. I am still paying for iA Presenter, and despite some thoughts, I think I’ll continue to use it for future presentations. I should also add that I’m using iA Writer for prose writing, not that I do much of that either.
- Social Clients: Still Tusky for now, but I’m wondering how long it’ll be before I install a BlueSky client too.
- Journalling App: I didn’t include this in last year’s list, but it’s worth mentioning here as I’ve moved away from Day One to a home grown web-app, similar to the one built by Kev Quirk.
- POSSE: Micro.blog, EchoFeed. Also a new category, now I’m doing this a bit more nowadays.
-
Looking At Coolify
While reading Robb Knight’s post about setting up GoToSocial in Coolify, I got curious as to what this Coolify project actually is. I’m a happy user of Dokku, but being one with magpie tendencies, plus always on the lookout for ways to make the little apps I make for myself easier to deploy, I thought I’d check it out.
So I spun up a Coolify instance on a new Hetzner server this morning and tried deploying a simple Go app, complete with automatic deployments when I push changes to a Forgejo repository. And yeah, I must say it works pretty well. I haven’t done anything super sophisticated, such as setting up a database or anything. But it’s almost as easy as deploying something with Dokku, and I’m please that I was able get it working with my Forgejo setup1.
Continue reading → -
Cropping A "Horizontal" PocketCast Clip To An Actual Horizontal Video
Finally fixed the issue I was having with my ffmpeg incantation to crop a PocketCast clip. When I was uploading the clip to Micro.blog, the video wasn’t showing up. The audio was fine, but all I got for the visuals was a blank void1.
For those that are unaware, clips from PocketCast are always generated as vertical videos. You can change how the artwork is presented between vertical, horizontal, or square; but that doesn’t change the dimensions of the video itself. It just centers it in a vertical video geared towards TikTok, or whatever the equivalent clones are.
Continue reading → -
WeblogPoMo AMA #3: Best Music Experience
I’m on a roll with these, but I must warn you, this streak may end at any time. Anyway, todays question is from Hiro who asked it to Gabz, and discovered via Robb:
Despite attending only a hand-full of concerts in my life — live music is not really my jam — I’ve had some pretty wonderful music-related experiences in my life, both through listing to it or by performing it. Probably my most memorial experience was playing in the pit orchestra for our Year 10 production of Pippin. This was during the last few weeks before the show opened and we attended a music camp for a weekend to do full day rehearsals with the music director. The director had a reputation of being a bit of a hard man, prone to getting a bit angry, and not afraid to raise his voice. It was intimidating to me at the time, but in hindsight I can appreciate that he was trying to get the best from us. And with us being a group of teenage boys who were prone to loosing focus, I think we were deserving of his wrath.
Continue reading → -
WeblogPoMo AMA #2: One Thing I Wish I Could Change About Myself
Here’s my answer to another question asked by Annie for WebogPoMoAMA. This was previously answered by Keenan, Estebanxto, Kerri Ann, and Lou Plummer:
If you could instantly change one internal pattern/thing about yourself, what would it be?
My answer is that I wish I found it easier meeting new people. Not only am I quite introverted, I’m also really shy, and I find it extremely hard to introduce myself to new people in social situations. That is, if I ever find myself going to these social situations. I rarely do, and if I do attend, I usually stay quietly to the side, keeping with company that I know. It was at one time bad enough that I’d find excuses to avoid going out to see those I do know.
Continue reading → -
Phaedra, The lmika Track Arrangement
I recently learnt that the version of Phaedra I’ve been listening to for the past 15 years had not only the wrong track order, but also the wrong track names. This is not entirely surprising, given how this version was… ah, acquired.
But after learning what the order and names should’ve been, I think I still prefer my version. And yes, that’s probably because I’m use to it, but if the official album were to have these names and this order, I think it would actually work really way. I may go so far as to say that if I got a copy of the official album, I’d probably change it to match the version I been listening to.
Continue reading → -
My Favourite Watch
Seeing all the nostalgia for digital watches of the ’90s and early 2000s, following the release of retroest desk clock shaped like a large Casio digital watch, it got me thinking of the watches I owned growing up. I started off as a Casio person but I eventually moved on to Timex watches. I was pretty happy with all the watches I owned, but my favourite was the Timex Datalink USB Sports Edition, which stood head and shoulders about the rest.
Continue reading → -
Why I Keep Multiple Blogs
Kev Quirk wrote a post yesterday wondering why people have multiple blogs for different topics:
A few people I follow have multiple blogs that they use for various topics, but I don’t really understand why. […] I personally prefer to have a single place where I can get all your stuff. If you’re posting about something I’m not interested in, I’ll just skip over it in my RSS feed. I don’t have to read everything in my feed reader.
Continue reading → -
On Panic, iA, and Google Drive
I see that Panic is shutting down their Google Drive integration in their Android app, much like iA did a few weeks ago. This doesn’t affect me directly: even though I am a user of both Android and Google Drive, I regret to say that I don’t use apps from either company on my phone (I do use a few things from both on my Apple devices).
But I do wonder why Google is enacting policies that push developers away from using Drive as general purpose user storage. That’s what Drive was meant to be used for, no? Does Google not think that by adding these security conditions, and not getting back to developers trying to satisfy them, is maybe pushing the scale between security and usefulness a bit too far out of balance? Are they thinking through the implication of any of this at all?
Continue reading → -
Passing
Three nights ago, and two months before her 94th birthday, my Nonna, my maternal grandmother, suffered a stroke. She’s now in palliative care and there’s no telling how much longer she has left. Over the last few years she was slowing down, yet was still quite aware and was able to do many things on her own, even travel to the shops by bus. She had a scare over the weekend but was otherwise in reasonably good health. So all of this is incredibly sudden.
Continue reading → -
Tools And Libraries I Use For Building Web-Apps In Go
I think I’ve settled on a goto set of tools and libraries for building web-apps in Go. It used to be that I would turn to Buffalo for these sorts of projects, which is sort of a “Ruby on Rails but for Go” type of web framework. But I get the sense that Buffalo is no longer being maintained. And although it was easy to get a project up and running, it was a little difficult to go beyond the CRUD-like layouts that it would generate (or it didn’t motivate me enough to do so). Plus, all that JavaScript bundling… ugh!
Continue reading → -
Micro-fiction: Get A Horse
Trying something new here. I came up with the concept of this short-story while riding home on the tram yesterday. The rest of it sort-of fell into place when I woke up at 5AM this morning, unable to get back to sleep. Hope you enjoy it.
Josh was riding the scooter on the city footpath, not trying super hard to avoid the other pedestrians. He was going at a speed that was both unsafe and illegal, but it was the only speed he knew that would prevent that horse from showing up. Besides, he had something that he needed to do, and it was only at such reckless speeds that he knew that that thing would work. Well, he didn’t know; but being at his wits’ end after trying everything else, he had to try this. He picked his target ahead and sped up towards it. Good thing he was wearing his helmet.
Continue reading →